

A + B = C (or AB, I don't know, I was never good at math.)
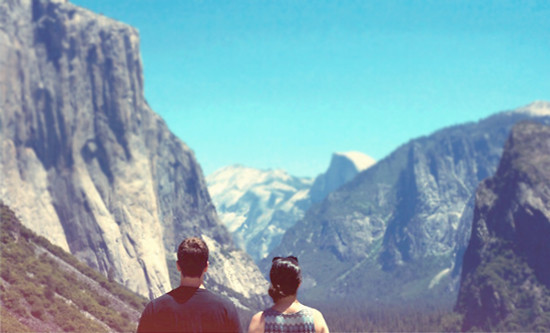
I have a tripod, but I don't always have all the time in the world to setup and (depending on the location) clear the crowds out of my way. In order to get the shot I want I've been using this method of taking 2 photos (1 taken by you and the other taken by your partner in crime) and combining them in Photoshop. Here is how I do it:
Out in the field (Aka wherever you are with your camera!)
2. Switch spots: Your friend should now be behind the camera standing in the exact same spot that you'd been. You should stand either a step to the right or left of where your friend had been standing.
Easy right? If you're using a digital camera you can scroll through the shots to make sure your shots line up well enough. They don't need to be perfect.
On your Computer in Photoshop:

4. Copy/Paste/Opacity: Copy Image B and Paste it onto Image A. Reduce the opacity of Image B to 50% so you can see hints of both images.

5. Move Image B: Using the "Move Tool," move Image B to exactly where you want it- to a spot that makes sense. Don't worry that the background might not match up perfectly.

6. Select/Inverse/Delete: Using the selection tool ("rectangular marquee tool") tool, make a little square around the person in Image B. Now go to "select" > "Inverse" and then press "delete." This will delete the entire Image B except for the person and a little space around them.

7. Erase: First, bring the "opacity" of Image B back up to 100%. Select the "Eraser tool" and reduce the "size" so that it's small enough, like a real pencil eraser or smaller. Reduce the "hardness" to around 70%. Zoom in so you have a good view of your workspace. Proceed to erase the extra background so that you're left with the person. Don't worry about making exact lines, since the person in image A and in B were photographed in the same place, the background colors will likely mesh well even if the 2 backgrounds don't match completely.

8. Flatten: When you're happy with your erasing job, flatten the image into 1 image. "Layer" > " Flatten image." That's it!

Now you can edit your image like you normally would if you like. I hope this was helpful! If you have any questions please feel free to ask either in the comments or through e-mail (alostfeather@gmail.com)
Some other examples:
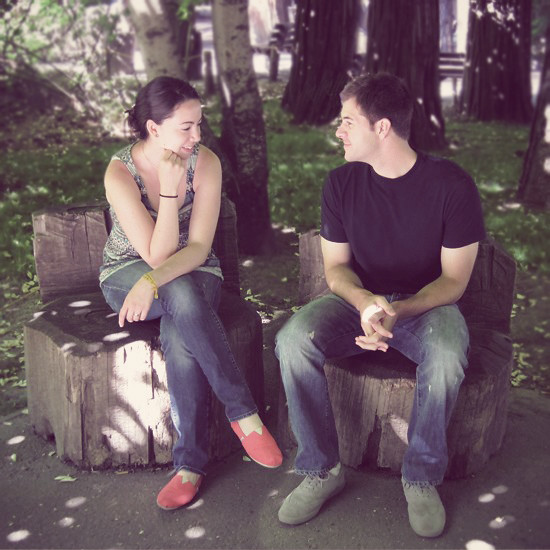
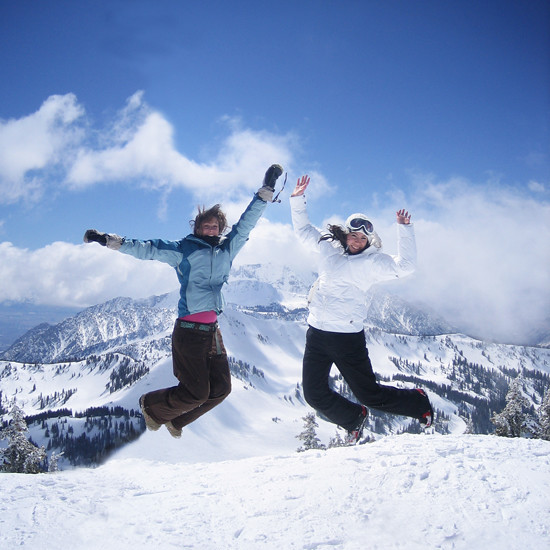
Let me know if you try it out! I'd love to see!

What an awesome idea! Great tutorial as well... and the pictures all came out so beautiful :)
ReplyDeleteGoodness I so need Photoshop!!
ReplyDeleteThat's awesome, I will definitely try this! Thanks Sarah for the tutorial!
ReplyDeleteAwesome! Great tutorial.
ReplyDeleteSuch a cool tutorial, thanks for sharing! I recently got Photoshop elements (couldn't afford the big deal right now) and am VERY SLOWLY learning, so this was right up my alley.
ReplyDeleteThis is brilliant! Hahaha, I'm so amazed. Loved this! x
ReplyDeleteI love love photoshop tips :)
ReplyDeleteWhat a beautiful photo! & such a great trick
ReplyDeleteGreat tutorial! It makes me wish (again)that I had Photoshop .
ReplyDeleteLove doing this .. do it all the time.
ReplyDeleteAlthough oddly, never of making it so to people end up in a photo together.
I use it to make 2+ of the same person:
http://a1.sphotos.ak.fbcdn.net/hphotos-ak-snc6/252769_10150621980625176_505050175_18963564_1736713_n.jpg
Me!
Great, great photos, and such an awesome tutorial! I'm going to have to try this!
ReplyDeleteBah that is amazing! I am sooo terrible at the one armed try to take a self pic of friend and myself. This could save a lot of random people from taking pictures of me :)
ReplyDeleteHey lady! I gave you a blog award... check it out on my latest post: http://graphicdesignconfessions.blogspot.com
ReplyDeleteThis is so amazing! Great tutorial :)
ReplyDeletexx
Wow you are a genius!! Thanks for sharing this. It will be great when we find it's just the two of us somewhere with no one to take our picture! x
ReplyDeleteOooh. Fantastic. I took a photography course last year and we did the very basics in Photoshop. I might have to take advantage of the free trial and give this a go. Nothing better than easy to follow instructions.
ReplyDeleteThe photos are all fantastic, it's such a great diea.
This is a great tutorial! I always want better pictures of Alex and I, out and about. This would be perfect!
ReplyDeleteAhh! I love this! Such a great result and much more creative than using a self timer ♥
ReplyDeleteoh my goodness....you are my favorite person as of today! what a PERFECT idea for sweet pictures :) and easy, too! thank you from the bottom of my heart for sharing! i want to try to make some this week :)
ReplyDeleteWow! I would love to try that sometime!
ReplyDeleteCarla xx.
love this :) i so want to try it sometimes too
ReplyDeletepinklemonincrystal.blogspot.com
helpful tutorial! i have just the photo in mind :) thanks for sharing!
ReplyDeleteYou have some really great photos! I'm following now because i've got a lot of exploring to do around your site!
ReplyDeletexo
mendesashley.blogspot.com